Documentation
Tile Builder Overview
Overview
 Tile Builder Basics
Take a quick tour around Tile Builders interface and discover just how easy it is to take your custom art and audio and turn them into tiles for use in Build a Game Universe.
Tilesets
Tilesets are a collection of individual tiles that together provide an end-user with the parts and pieces necessary to build parts of levels and or to construct entire games.
Review Process
Discover how easy it is to prepare your tiles for a review and the simple process that ensures positive content is made available to the Build a Game Universe and Market Center.
Getting Help
The help section of Tile Builder enables you with easy access to multiple ways to learn. Formats for learning include written documents, manuals, video tutorials and workshops. The time to learn is now!
System Requirements
Tile Builder is engineered to work on multiple platforms so you can enjoy work from the platform you choose. Review the requirements and systems that Tile Builder supports below.
Let's jump into the Tile Builder reference and take advantage of all the great features and options that will make your Tilesets amazing!
Tile Builder Basics
Take a quick tour around Tile Builders interface and discover just how easy it is to take your custom art and audio and turn them into tiles for use in Build a Game Universe.
Tilesets
Tilesets are a collection of individual tiles that together provide an end-user with the parts and pieces necessary to build parts of levels and or to construct entire games.
Review Process
Discover how easy it is to prepare your tiles for a review and the simple process that ensures positive content is made available to the Build a Game Universe and Market Center.
Getting Help
The help section of Tile Builder enables you with easy access to multiple ways to learn. Formats for learning include written documents, manuals, video tutorials and workshops. The time to learn is now!
System Requirements
Tile Builder is engineered to work on multiple platforms so you can enjoy work from the platform you choose. Review the requirements and systems that Tile Builder supports below.
Let's jump into the Tile Builder reference and take advantage of all the great features and options that will make your Tilesets amazing! Basics

![]()
Work-Flow Graphic
Work-Flow The work-flow is simple yet powerful while it maintains a balance of providing the control and options needed to create complex groups of tiles for a feature rich tileset. In this image we see the basic process to create a custom tileset. Let's briefly look at each one and identify the actions that occurs in them.Tileset
 This section is your spot to get started learning about tiles and the collection of tiles that make Tilesets.
Crafting a Tile Example
A tile is a container that holds images, animations, audio and behaviors. The first 3, images, animations, audio are files that you bring to the project.For example, let's make a ladder for our game.
First we'll need to create a graphic.
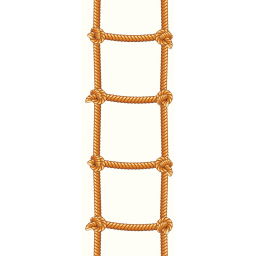
Ladder Graphic
Here we have a made a rope ladder that can tile horizontally. It'll be perfect for our adventure game!
Let's have a closer look at the details of our image.
Image Details:
[table id=16 /]
Ladder Table
This ladder is a good example of a basic object found in games. The properties listed above illustrate the details of the image and thought process that went into creating the ladder. It uses a simple naming and numbering convention making it easy to add more ladders, a .png file format which Tile Builder supports, and a modest size of 128 pixels by 128 pixels.
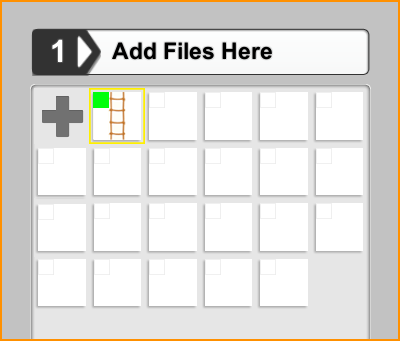
Next, let's import it into Tile Builder and turn it into a tile. As we saw in Tile Builder Basics, the first step is to Add Files.
Step 1 - Add Files Graphic
Selecting the green addition icon in the corner allows us to load our images. When the image folder is selected it will load the image or images into the file list panel.
As we can see in the image above our ladder is loaded into our project. Notice the green square in the corner. This is our option for setting the image used as the icon for our tileset. It is used in the Market Center and in the Build a Game editor to represent the Tileset.
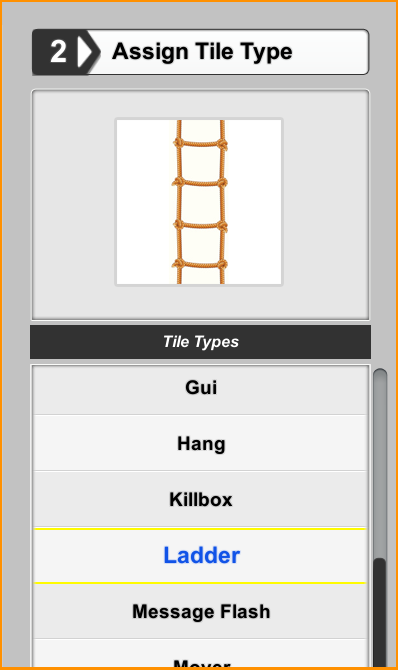
Our next step is to decide what kind of functionality our sturdy little rope ladder should have. We know that it is a ladder and that our character should be able to climb up and down on it.
Let's select our ladder image and look at step 2. Our ladder image is now visible in the selection preview and ready for us to pick a tile type. Scrolling through the list of tile types we choose the ladder tile type.
Step 2 - Assign Tile Type Graphic
Select the Ladder tile type. This reveals a set of properties in Step 3 that we can edit to customize our tile.
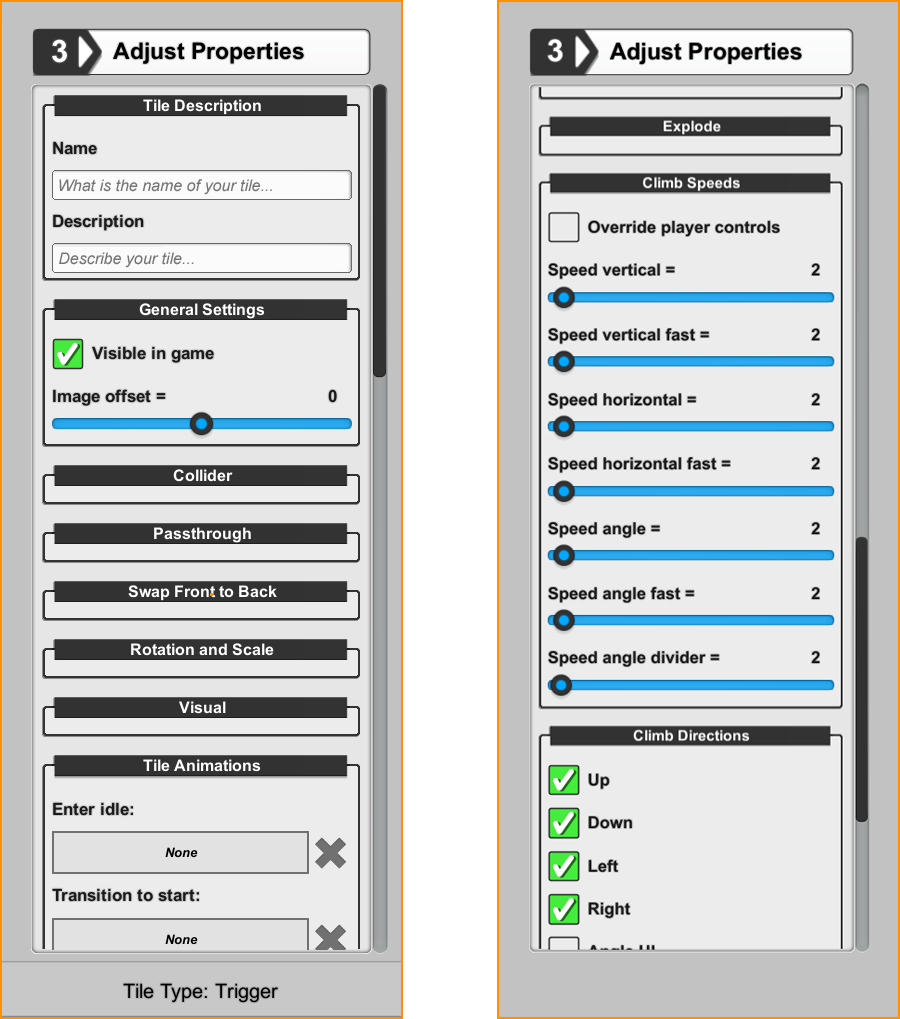
Next, in Step 3 we see the options available for a ladder tile type. The options are in group boxes with headings that describe what's inside.
Step 3 - Adjust Properties Graphic
Scrolling down the panel reveals several group boxes and labels letting us know what our tile can do. Select a group to expand the box and then make adjustments where you want. We can add a name to our tile, animations, controls and more. Time to get curious and and see what ladders can do!
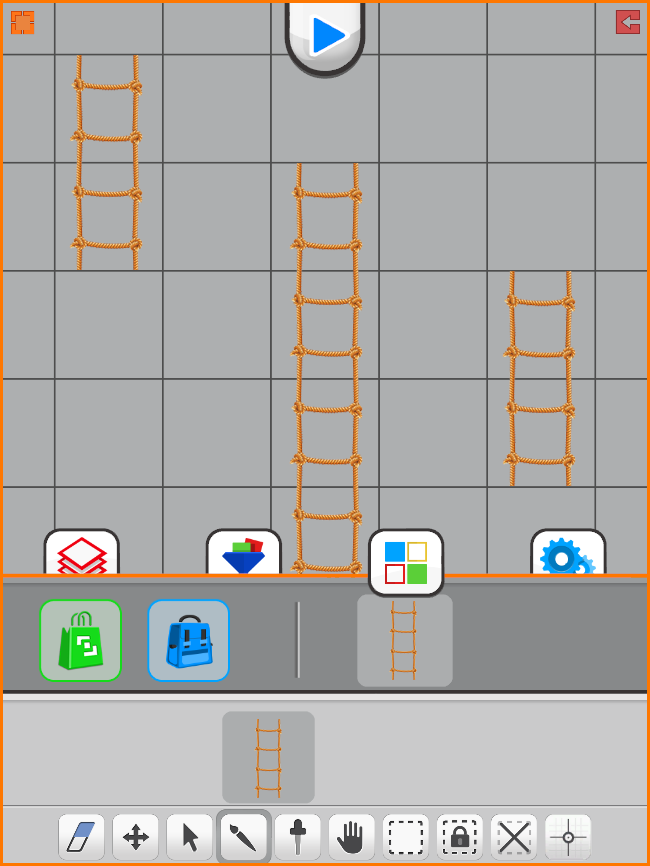
Next we construct a collider for our ladder. The collider helps us to know the boundaries for our tile. We can also adjust our helper shapes to define the top and bottom of our ladder.

Step 4 - Construct Tile Graphic
Lastly we can test our tile in Build a Game by submitting it in Step 5.

Step 5 - Submit Files Graphic
Step 5 allows for 3 modes to submit. Each mode provides different options for developing and publishing our content. For our example we select development mode. This is a great mode for testing our tiles.
Lastly we can test our tile in Build a Game.
Test Files in Build a Game Graphic
Load Build a Game, select build, create a new level and check under the Tileset tab. Our ladder Tileset icon is visible and ready. Select the Tileset icon and it reveals the tiles in the Tileset.
We are now ready to try our tile and see how we did! Looks Awesome, Great job!
We now see how to make tiles a part of our project, how to craft a tile and how tiles are stored in Tilesets for use in Build a Game. As a side note, there are no limits to the number of tiles stored in a tileset, though our suggestion is to keep it organized and comfortable to manage, you can put in what ever number of tiles you need.
Once testing of the tile is complete, we simply return to Tile Builder, make adjustments and continue adding tiles to complete our set. Altogether the process is streamlined and ready for you to take advantage of!Review Process
 Our audience of both players and creators are diverse in many ways and to create a safe environment we established a Review process for tile content that is accessible within the Build a Game Universe. (Note: The review process only occurs for tile content.)
Overview
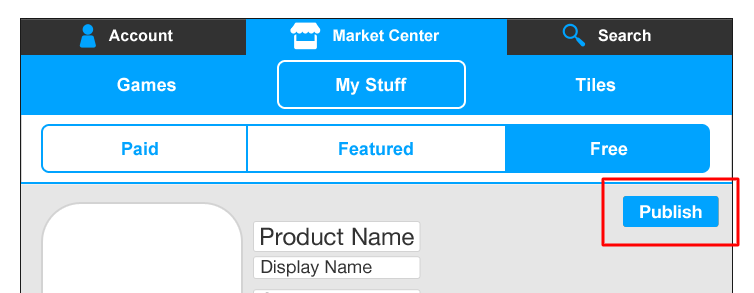
How it works is simple, in Step 5 of Tile Builder we choose the publishing option for a Tileset.
Our audience of both players and creators are diverse in many ways and to create a safe environment we established a Review process for tile content that is accessible within the Build a Game Universe. (Note: The review process only occurs for tile content.)
Overview
How it works is simple, in Step 5 of Tile Builder we choose the publishing option for a Tileset.

My Stuff Publish Graphic
In Private mode the tileset will be available for use in the Build a Game editor.
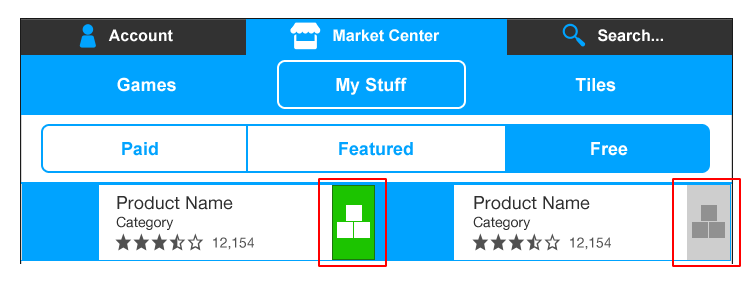
My Stuff Tileset Lock / Unlock Graphic
Corrections If concerns about an image or audio file are made, the submission is flagged and a correction list is sent to you. If you receive a correction list, simply make the adjustments required and resubmit. (Note: When resubmitting, only tiles that have been edited are reprocessed. Which means the re-review process goes quicker if only the flagged files are edited. The re-review submit maintains the state of previous tiles, so if it passed it won't have to be re-reviewed and you can get your review processed more quickly.) After a successful review you'll be ready to publish and use your tilesets. The review is a simple process that helps to ensure a safe environment for a broad range of users making the Build a Game Universe a friendly and encouraging spot for everyone. As we like to say 'Review and Use'! Looking forward to seeing everything you make!Getting Help
 To assist in this effort we are launching with reference manuals, training videos, written tutorials, classroom curriculum, forums and a host of social media outlets to keep everyone informed and connected.
This is a unique and progressive direction for game development and game play that through a well informed end-user who can take ownership of the software will have every opportunity to succeed!
Main Site Map
Reference Manuals
Training Videos
Tutorials
Curriculum
Forums
Facebook
Twitter
To assist in this effort we are launching with reference manuals, training videos, written tutorials, classroom curriculum, forums and a host of social media outlets to keep everyone informed and connected.
This is a unique and progressive direction for game development and game play that through a well informed end-user who can take ownership of the software will have every opportunity to succeed!
Main Site Map
Reference Manuals
Training Videos
Tutorials
Curriculum
Forums
Facebook
Twitter System Requirements
 System Requirements
Linux
Ubuntu
Core 2 Duo or Later CPU required
Minimum of 2GB of RAM recommended
Mac
Mac OSX Lion or Later
Core 2 Duo or Later CPU required
Minimum of 2GB of RAM recommended
Windows
Windows Vista, Windows 7, or Later
Core 2 Duo or Later CPU required
Minimum of 2GB of RAM recommended
System Requirements
Linux
Ubuntu
Core 2 Duo or Later CPU required
Minimum of 2GB of RAM recommended
Mac
Mac OSX Lion or Later
Core 2 Duo or Later CPU required
Minimum of 2GB of RAM recommended
Windows
Windows Vista, Windows 7, or Later
Core 2 Duo or Later CPU required
Minimum of 2GB of RAM recommended Tile Builder Editor
Basics
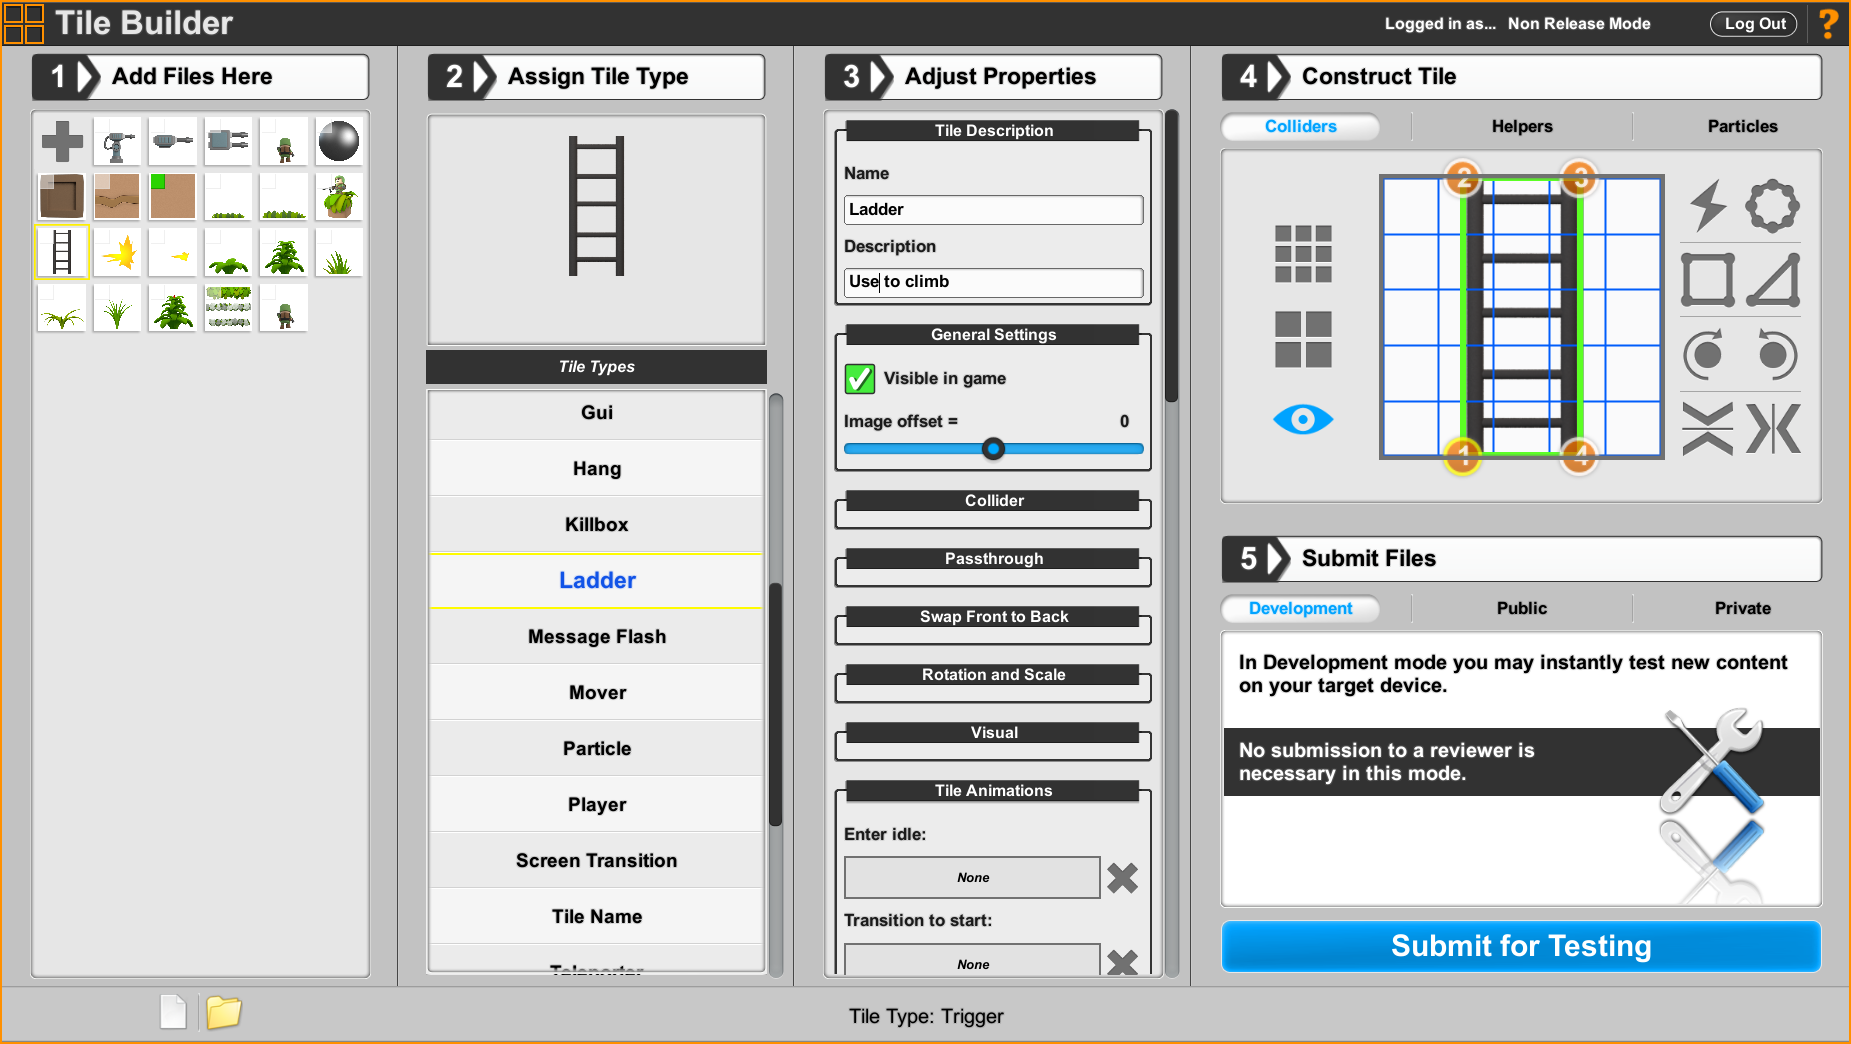
Tile Builder Application
Top Bar The top bar is your spot for getting started with Tile Builder. Access your project files and content by logging in here. If you are a new user start by creating an account. Panel 1 - Add Files The add files panel manages loading, removing and ordering of files for your project. A thumbnail view of assets loaded are presented in the panel and additional controls for setting the order of tiles allow for managing how they will appear in the tileset. Panel 2 - Assign Tile Type The assign tile type panel provides you a growing list of behaviors that provide functionality, rules and logic to create your Tilesets and games. The panel becomes active when a selection is made and may then be used to define the current selections type / behavior. Panel 3 - Set Properties The set properties panel manages the editing of tiles type properties. These properties are edited in group rollout boxes that use text boxes, sliders, check boxes, radio buttons, and file load options. Panel 4 - Construct Tile The construct tile panel is responsible for the editing of colliders, adjustment and placement of helper objects, and the viewing of particle construction. Panel 5 - Submit Files The submit files panel helps you manage the development, export, and access level of tilesets. Tilesets can be submitted for 3 different release modes, development, public, and private. Bottom Bar The bottom bar contains file management tools, hints, and a submission progress bar. File Browser The file browser enables searching for files, folders and projects.Overview
 Editor Overview
Discover the process and work-flow that Tile Builder lays out to make your projects a success. Embrace a straightforward approach to crafting your tiles with our 5 step approach to getting your tiles and Tilesets completed with ease.
Editor Reference
The editor reference section explores and details the editor panels, buttons, sliders and options available when you craft a tile. Review the details for each part of the editor to level up your skills and become an expert with Tile Builder.
Editor Best Practices
Industry best practices with the editor focuses on a production environment usage of the tool. Learn how to improve your work-flow and enjoy helpful tips for making your content and Tilesets the very best!
Editor Overview
Discover the process and work-flow that Tile Builder lays out to make your projects a success. Embrace a straightforward approach to crafting your tiles with our 5 step approach to getting your tiles and Tilesets completed with ease.
Editor Reference
The editor reference section explores and details the editor panels, buttons, sliders and options available when you craft a tile. Review the details for each part of the editor to level up your skills and become an expert with Tile Builder.
Editor Best Practices
Industry best practices with the editor focuses on a production environment usage of the tool. Learn how to improve your work-flow and enjoy helpful tips for making your content and Tilesets the very best! Top Bar

Top Bar Graphic
[table id=8 /]Panel 1 - Add Files

Panel 1 Graphic
[table id=6 /]
Right Click Context Menu The right click context menu is available though the right mouse button. Right click on a thumbnail image and choose from several options available. This menu enables you to organize, adjust, and manage your files.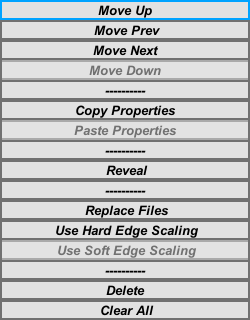
Panel 1 Context Menu
[table id=7 /]
Details
Tileset Icon Assign your tileset icon by selecting the check box in the upper left corner of the thumbnail image. This image displays in the Market Center and in the Editor under tilesets. Be sure to create an image that will stand out and properly define your tiles. Soft edge
An image loads with default setting to smooth the edges of a pixel. This smoothing effect creates a soft line between the images pixels and the transparency.
Hints
Replace file is a great way to adjust graphics that you adjusted or changed while maintaining all the settings and loaded content on a tile. Be sure to give it a try early on and see how it can benefit your project.
Copy and Paste properties from one tile to another is a great way to speed up your development. Tilesets generally have several tiles that function the same but have different graphics which is where copy and paste become very useful.
Trying to find a file on your computer from the project, just click on reveal and go instantly there.
Soft edge
An image loads with default setting to smooth the edges of a pixel. This smoothing effect creates a soft line between the images pixels and the transparency.
Hints
Replace file is a great way to adjust graphics that you adjusted or changed while maintaining all the settings and loaded content on a tile. Be sure to give it a try early on and see how it can benefit your project.
Copy and Paste properties from one tile to another is a great way to speed up your development. Tilesets generally have several tiles that function the same but have different graphics which is where copy and paste become very useful.
Trying to find a file on your computer from the project, just click on reveal and go instantly there. Panel 2 - Assign Tile Type
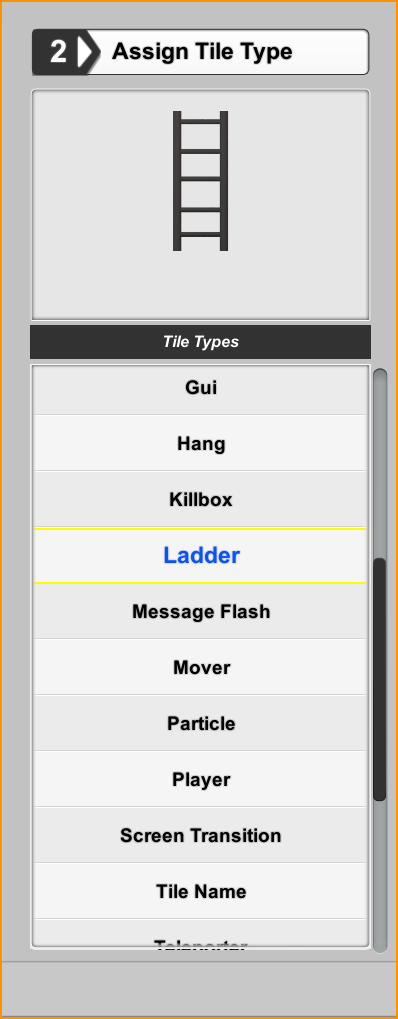
Panel 2
[table id=5 /]
Details Tile Types are the brain behind your art and audio as a tile. The second step in this process is very important as it helps to define the overall expectation of what your asset should do. For Example: If your images are for a background and you want them moving in the background then we need a tile type that can support it. Let's choose the Tile Type Background.
Panel 3 - Adjust Properties
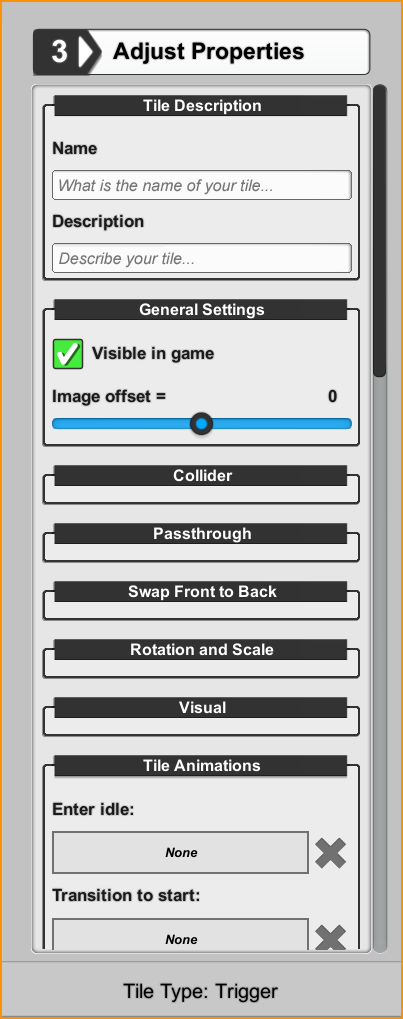
Panel 3 Graphic
Properties[table id=4 /]
Panel 3 Table
Details Tile Types contain properties that affect everything from how we see a tile, hear a tile and interact with a tile. These properties are all accessible through the group boxes in panel 3. Adjusting these properties enable you to make tiles that are specific to your designs while also allowing for emergent designs to develop. Loading graphic and audio files searches only through the project files that are loaded. Be sure to load all the files you need for your project in Panel 1 in-order to access them from this load option. For audio files, you can play, stop and delete the files from the load file button. Hints Remember to use the copy tile properties option in the right-click context menu from panel 1 to quickly copy and paste a tiles properties from one tile to another. Tile properties are also available in the Build a Game editor. After making adjustments here, be sure to check them out in he editor, make adjustments where needed and then come back here to polish the tile off. When working with group boxes, it's helpful to only open groups that you are working on. It'll reduce the clutter, keep you focused on what the tile needs and make it easier to scan through group box titles.Panel 4 - Construct Tile
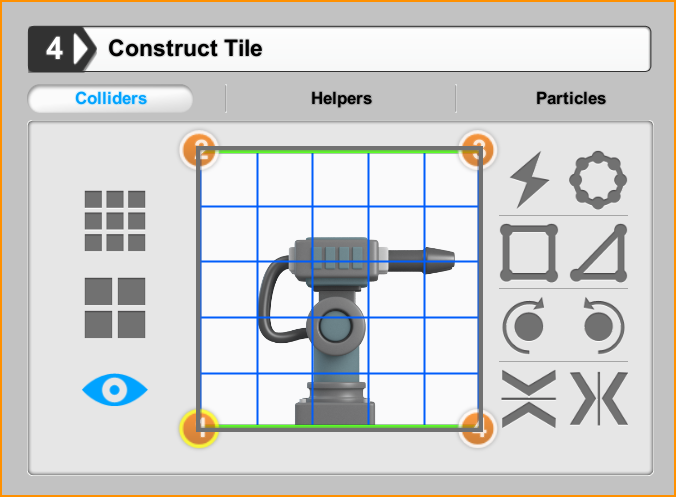
Panel 4 Collider Graphic
[table id=1 /] Helpers Mode In Helper Mode you may see a set of boxes that display based on the tile type selection. Tile types require various helper objects to be adjusted to ensure that your custom content works properly when in use.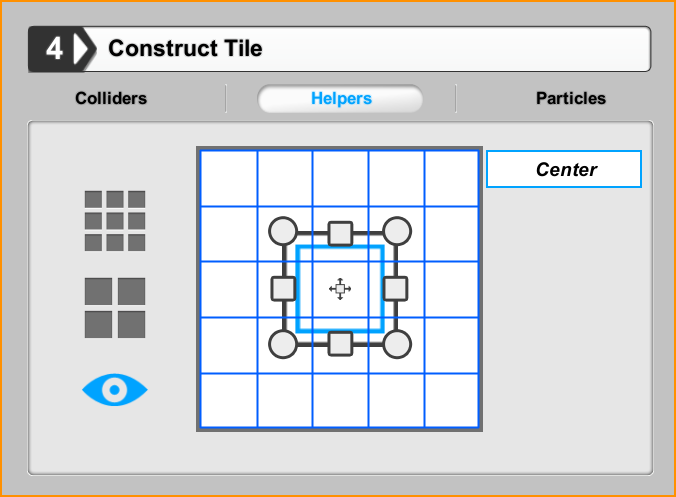
The Panel 4 Helper Graphic
[table id=2 /] Particles Mode In Particle Mode you can visualize the adjustments and construct particle creations.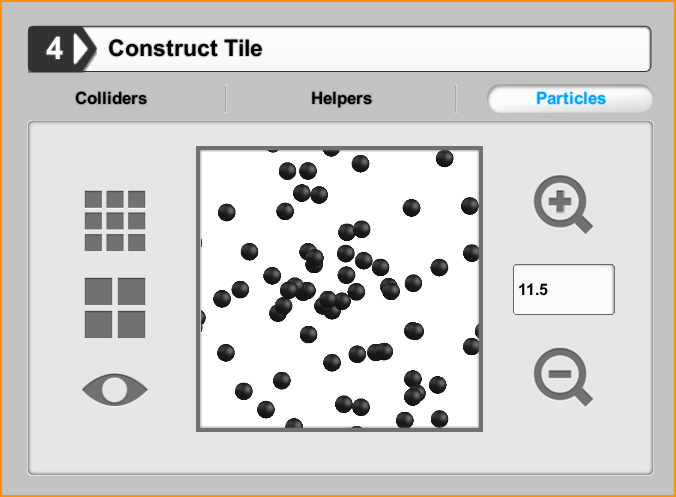
The Panel 4 Particle Graphic
[table id=3 /]Panel 5 - Submit Files
 Panel 5 Development Mode Process Graphic
 Panel 5 Public Mode Process Graphic
 Panel 5 Private Mode Process Graphic
Development Mode
In Development Mode you submit tiles with the purpose to instantly test new content on your target device without the need for review. Development Mode is your opportunity to experiment and iterate on tiles that you craft within a safe environment that's all about you doing your best work! Note: Development Mode is published privately to your account and not available for others to view or use. It's your chance to work and test privately with your tiles to make them just right.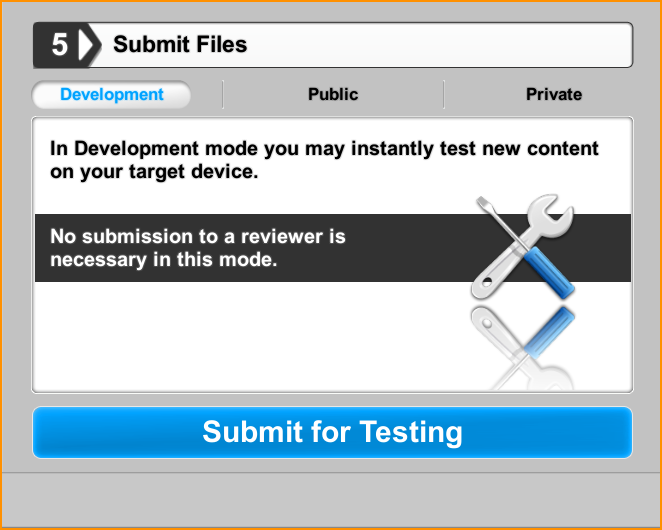
Panel 5 Development Graphic
[table id=9 /]
Process
Create Develop the graphics, animations and sounds for use in your tilesets.
Craft Construct and define tile properties. Submit Upload tiles to your account. Review Not Applicable / by passes this step in development mode. Test Access tiles in your account and use tiles in Build a Game editor for testing. Iterate Edit and adjust tiles, then resubmit for continued testing.Public Mode
In public mode you submit tilesets with the purpose to either *Share or *Sell the assets within the Market Center of Build a Game. Public mode is unique because of its connection with the Market Center and the access you have to publish original content to the store front.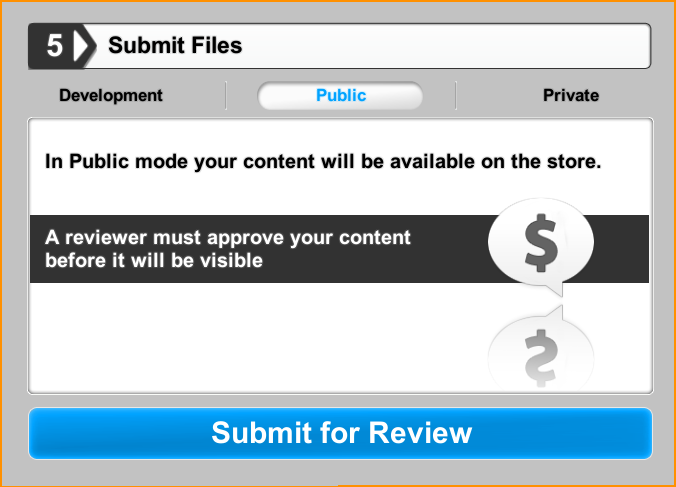
Panel 5 Public Graphic
[table id=10 /]
Process
Create Develop the graphics, animations and sounds for use in your tilesets. Craft Construct and define tile properties. Submit Upload tiles to your account. Review Tiles go through a review process with respect to the Terms of Agreement Account Tiles load into your account and await your edits and pricing. Publish Single click publishing to all supported devices. Note: If tiles are updated the publish option becomes update and automatically adjusts version number.Private Mode
In Private Mode you submit tiles with the purpose to build games with tiles that are protected. These tiles are not accessible to others and maintain their legal status of ownership to the creators. This mode is especially useful for intellectually property that must remain protected within the Build a Game Universe application.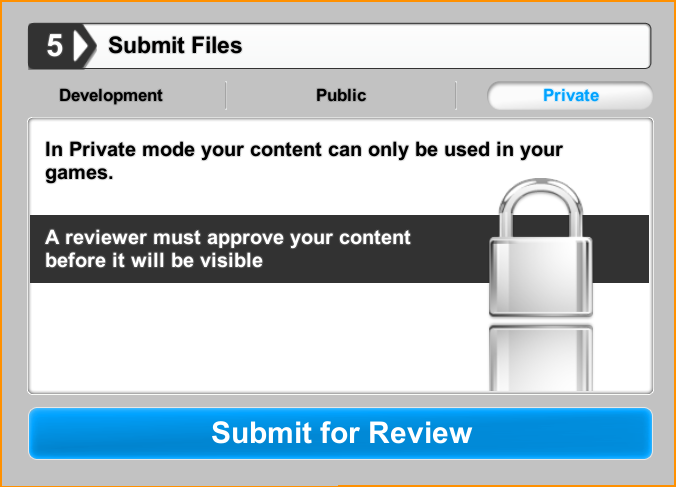
Panel 5 Private Graphic
[table id=11 /]
Process
Create Develop the graphics, animations and sounds for use in your tilesets. Craft Construct and define tile properties. Submit Upload tiles to your account. Review Not Applicable / by passes this step in development mode. Account Tiles load into your account and become available for use. Build Create and publish games using your private tiles.Details
Review Process Build a Game Universe is committed to providing a safe and friendly environment to its users and honor the license agreements of our distributors. To ensure consistent and positive content we provide a free streamlined review process by our dedicated staff of Content Reviewers. The review process typically takes between 1 day to 14 days to complete and upon completion the developer will receive 1 of 2 responses. 1. Your tileset has passed the review! Congratulations! or 2. You're almost there! Your tileset requires some adjustment. A brief list will follow with the necessary adjustments outlined. Note: Please be aware that your content must meet the requirements of all distributions outlets (Microsoft, Apple, Nintendo, Sony, Android, Steam, etc.) Be sure to read over the terms of agreement document for further details which collectively expresses the wishes of each distribution platform. Hints Development Mode is your friend! Be sure to take advantage of testing your tiles, building with your tiles and reviewing the tiles and functionality on all supported platforms before publishing to the Market Center. You have complete control over your Tilesets. You may publish and update Tilesets as often as you need. So stay calm and rest assured any little detail you might have forgotten can be made right, worry free.Bottom Bar

Bottom Bar Graphic
[table id=12 /]
Project Details
When you are ready to create a tileset there are a couple of steps to get started. First, we create a folder to hold our project and it's tiles. In this example we have a folder called 'zombie hunters'.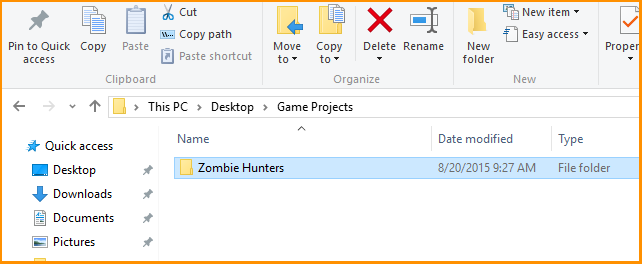
New Project Folder Graphic
Next we chose the option in Tile Builder called 'New Project'.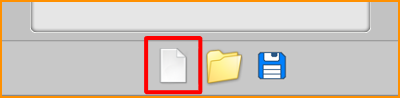
New Project Graphic
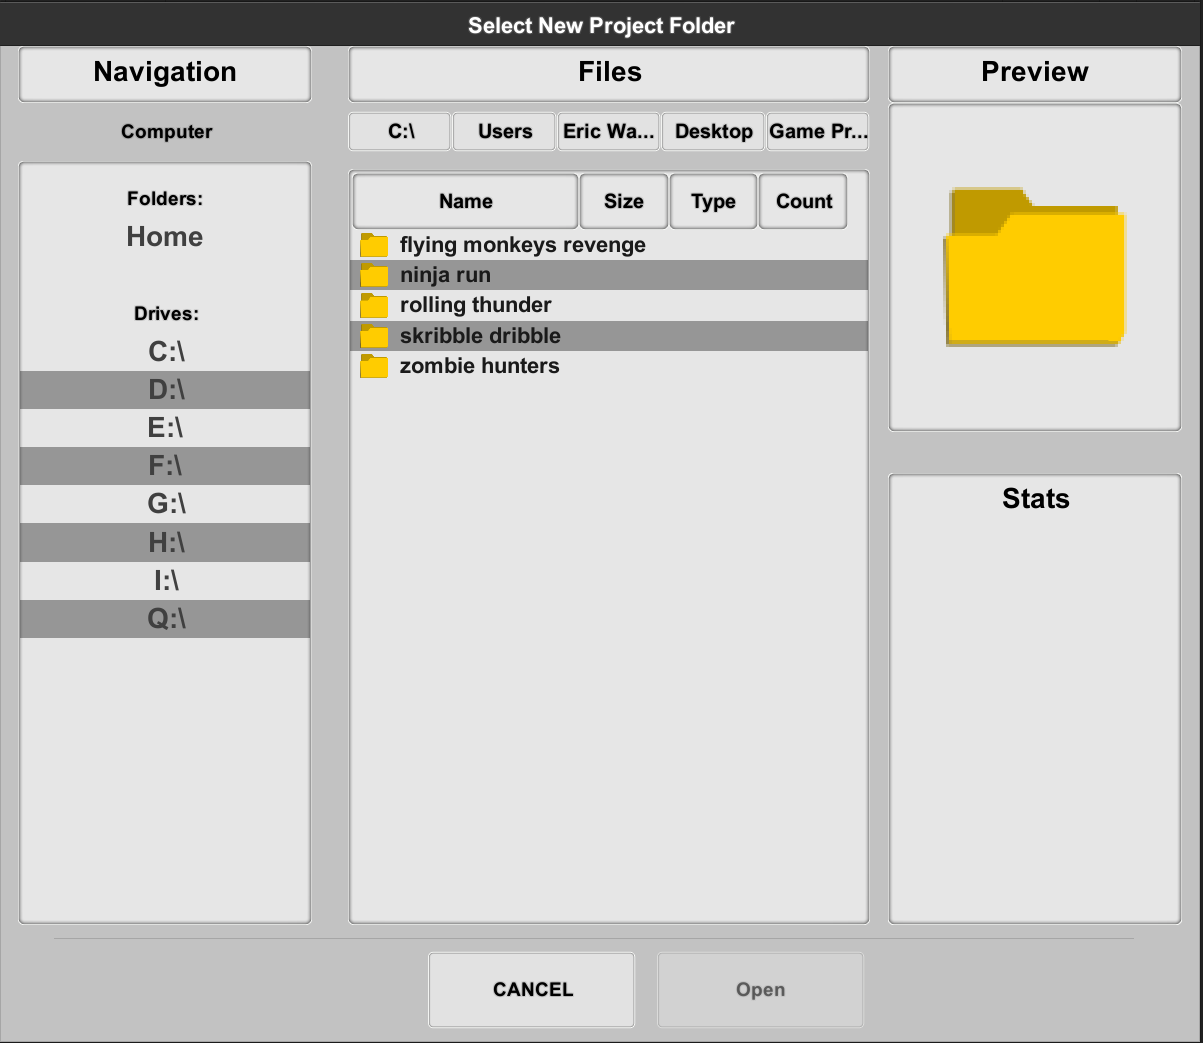
The New Project button opens the browser window for us to select the folder that we are going to store our project in. Navigate to the 'zombie hunters' folder and select it.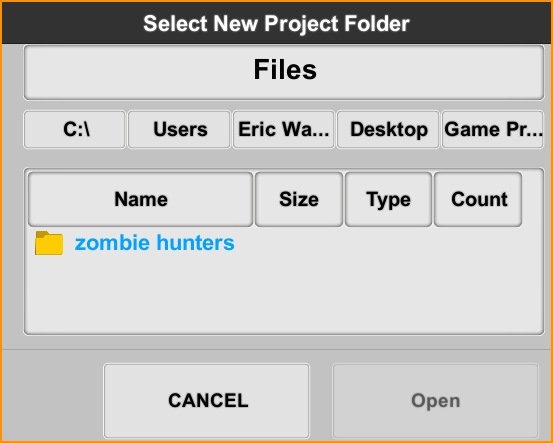
Find Project Folder Graphic
Then click on the open button to assign this as the project folder.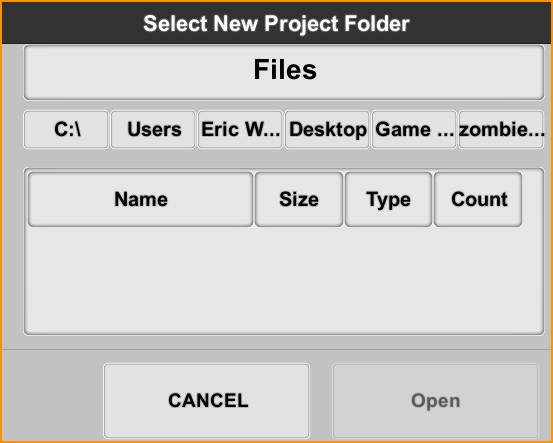
Select and Open (assign) Folder Graphic
You are now ready to add tiles to your project using panel 1, Add Files button. Start adding tiles and enjoy crafting your tileset!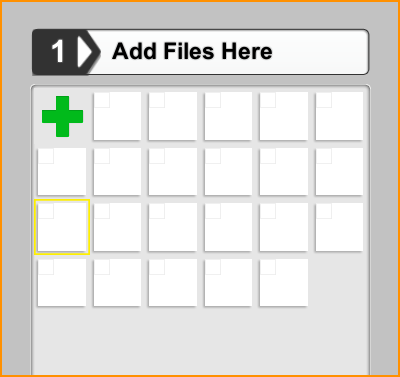
Add Files to Project Graphic
Projects come in many shapes and sizes therefore Tile Builder allows for as many projects as you want and tilesets can be of any number you need. The parameters for your project are completely up to you and can be guided by our Best Practices Guides and Tutorials. Hint The submission process performs 2 functions during the submit phase. First it checks against files that are on the server and prepares uniques files for export. Secondly, it uploads the files to the server. In development mode your files are also loaded on the server making them available to you for testing across all supported platforms.File Browser
- Select a Project Folder
- Load a Project
- Add Files to Project.
Select New Project Folder Graphic
The Load Project browser allows you to select a project file and open it up in Tile Builder.
Load Project Graphic
The Add Files to Project browser allows you to select folders and files to load into the project. If you want to load animations be sure to select the animation options to load a sequence of images.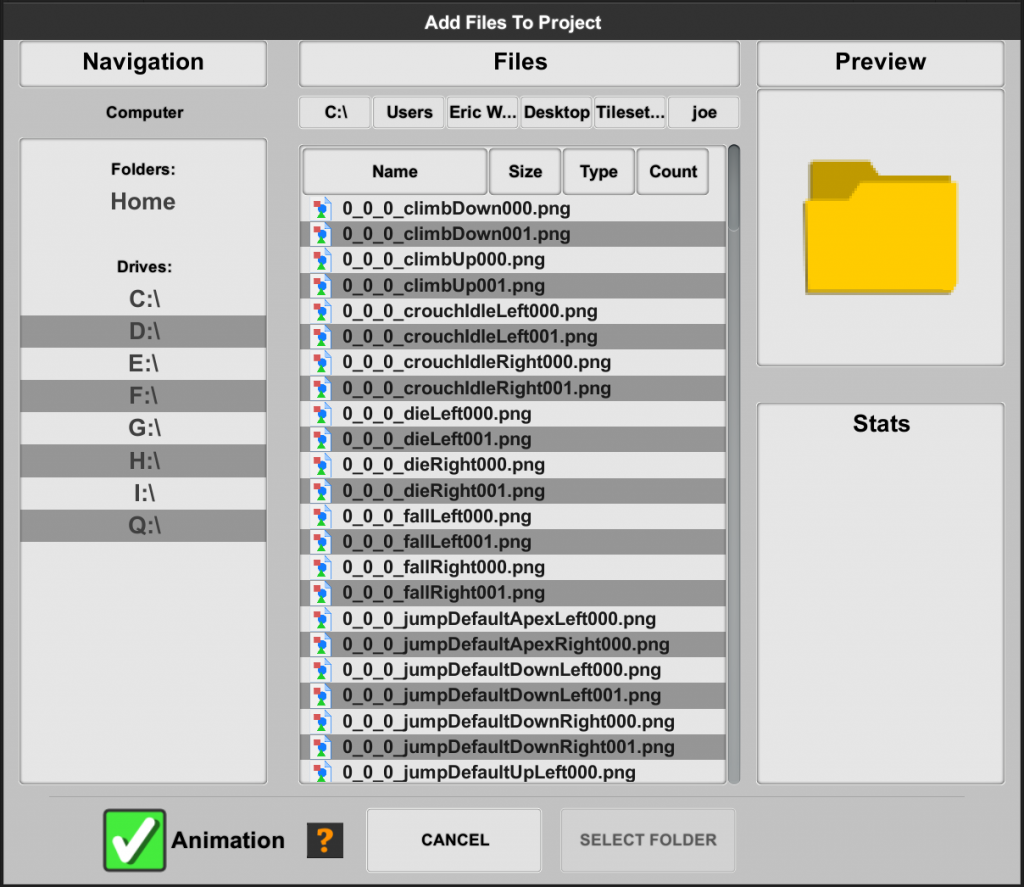
Add Files to Project Graphic
[table id=13 /]
Hint When loading in files be sure to check the naming convention section for best practices. Use the correct naming convention and Tile Builder will automatically prepare your tiles for you!Best Practices
Editor Properties
Tile Types Tile types have many properties and options that are both unique to a tile and global to all tiles. Be sure to review the tile types section to get a better understanding of how each tile functions. Copy Paste Crafting tiles can be optimized by knowing which tiles are similar and using the copy paste properties function to improve the speed of developing your tiles. Construct Tile Take advantage of the auto-generate collider option to get the initial shape of your collider. Adjust by moving or removing collider points as needed. Submit Files While developing / training / practicing / experimenting /etc. be sure to stick with the development mode for testing. No wait times, just submit and start using it in Build a Game. Best option hands down.Organizing
Naming Convention Be sure to follow the naming convention to have your files automatically loaded. Tilesets Remember to organize your tiles in panel 1 the way you want to see them in the editor. Think about which tiles you use most and which ones are most important to help you lay out the order.Graphic Content
Graphic Guidelines

Note: We recommend using the PNG file formats for final images.
[table id=13 /]
Note: We recommend files are kept as squares and use the file sizes listed. Please note this is not required just suggested. Naming Convention To help create a standardized format for the naming of files, we establish a set of rules and examples with the hopes that our community will adopt and use them. A good naming convention is one that is readable, descriptive and consistent. So let's take a look at our example. type_variation# ladder_001 nameType_variation# trapDamage_001 nameDescriptionType_variation# coinSilverPickup_001 nameDescriptionLocationType_variation# environmentSnowTopCenterBlock_001 Name This is the name of your image. Description Choose a detail word that best describes your image. Location If your image is part of a group of images you can detail it location here. Type This is the tile type that the image is to become. Variation # / Animation Frame # Iterate through different images that have the same name. Each naming convention provides a clear and concise message to a reader and allows Tile Builder to take advantage of certain keywords to automate some of the tile crafting process. Tile Type Keywords Use of tile type keywords in your file names will auto assign that tile type to your file in Tile Builder. This is a simple step that helps remove clicks in the process. Note: Adjustments to the tile type can be made in the editor by selecting alternate tile types. To encourage adopting these naming conventions we tied several loading automation features to files using the correct names. By using these standard naming conventions files will automatically load onto tiles and in correct sections. For example, animation files will come in pre-loaded within the animation groupbox, and audio files will come in pre-loaded within the audio groupbox. Great time savers and click savers! For a complete list of tiles and names check Tile Type Reference Section.Audio Content
Audio Guidelines

[table id=14 /]
Note: We recommend general audio effects be kept small to average. Please note this is not required just suggested. Naming Convention To help create a standardized format for the naming of files, we establish a set of rules and examples with the hopes that our community will adopt and use them. A good naming convention is one that is readable, descriptive and consistent. So let's take a look at our example. type_variation# ladder_001 nameType_variation# trapDamage_001 nameDescriptionType_variation# coinSilverPickup_001 nameDescriptionLocationType_variation# environmentSnowTopCenterBlock_001 Name This is the name of your sound. Description Choose a detail word that best describes your sound. Location If your sound is best played in a specific location list it here. Type This is the tile type that the sound is to become. Variation # Iterate through different sounds that have the same name. Each naming convention provides a clear and concise message to a reader and allows Tile Builder to take advantage of certain keywords to automate some of the tile crafting process. Tile Type Keywords Use of tile type keywords in your file names will auto assign that Tile Type to your file in Tile Builder. This is a simple step that helps remove clicks in the process. Note: Adjustments to the tile type can be made in the editor by selecting alternate tile types. To encourage adopting these naming conventions we tied several loading automation features to files using the correct names. By using these standard naming conventions files will automatically load onto tiles and in correct sections. For example, animation files will come in preloaded within the animation groupbox, and audio files will come in preloaded within the audio groupbox. Great time savers and click savers! For a complete list of tiles and names check Tile Types Reference Section.Animation Content
Animation Guidelines


Correct way to prepare an animation Graphic
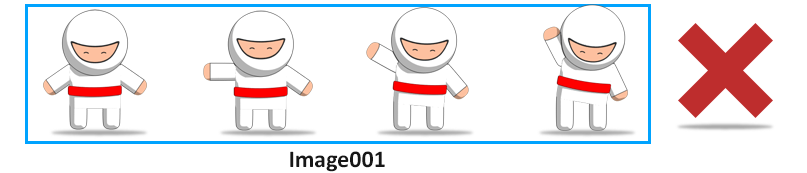 Incorrect way to prepare an animation Graphic
[table id=13 /]
Note: We recommend files are kept as squares and use the file sizes listed. Please note this is not required just suggested.[table id=15 /]
Note: Animations are automatically optimized per device. Naming Convention To help create a standardized format for the naming of files, we establish a set of rules and examples with the hopes that our community will adopt and use them. A good naming convention is one that is readable, descriptive and consistent. So let’s take a look at our example. typeFrame# bush001 | bush002 | bush003 nameStateFrame# trapIdle001 | trapIdle002 nameDescriptionTypeStateFrame# coinSilverPickupHurt001 nameDescriptionLocationTypeStateFrame# environmentSnowTopCenterBlockIdle001 Name This is the name of your image. Description Choose a detail word that best describes your image. Location If your image is part of a group of images you can detail it location here. Type This is the tile type that the image is to become. State Label the states your tile uses. Note: Specific name cases pre-populate the animation list. Variation # / Animation Frame # Iterate through different images that have the same name. Each naming convention provides a clear and concise message to a reader and allows Tile Builder to take advantage of certain keywords to automate some of the tile crafting process. Tile Type Keywords Use of tile type keywords in your file names will auto assign that tile type to your file in Tile Builder. This is a simple step that helps remove clicks in the process. Note: Adjustments to the tile type can be made in the editor by selecting alternate tile types. To encourage adopting these naming conventions we tied several loading automation features to files using the correct names. By using these standard naming conventions files will automatically load onto tiles and in correct sections. For example, animation files will come in pre-loaded within the animation groupbox, and audio files will come in pre-loaded within the audio groupbox. Great time savers and click savers! For a complete list of tiles and names check Tile Type Reference Section.